배경
큰 기업일 수록 관리자도 많고 사용자도 다양해 리소스 관리가 어려운 것 같습니다.
사용자 자유도도 보장해야 하고 운영성도 챙겨야 하니 더 어려운데요.
최근 회사에서 AX 전환의 흐름으로 데이터 분석 사용자가 늘어나면서 notebook instance 사용량도 크게 늘었습니다
이에 따라 관리 측면에서는 미사용 시 자동으로 stop 되도록 정책을 개선할 필요가 생겼고,
기존에는 사용자 유입과 사용량이 적어 수작업으로 관리하던 것을 자동화 하였습니다.
결과 운영 안정성과 비용 관리 두 측면에서 의미 있는 변화를 이루어 내용을 공유 드립니다.
적용 효과
- 월 $556(약 66.7%)의 비용 절감 효과가 있었습니다. (기존 대비 최소 약 66.7% 비용 절감 효과)
설명
목표
AWS Sagemaker에서 제공하는 노트북 서비스 중
Sagemaker notebook instance 에서 사용자가 노트북 생성 시 lifecycle을 update 하도록 자동화하는 것입니다.
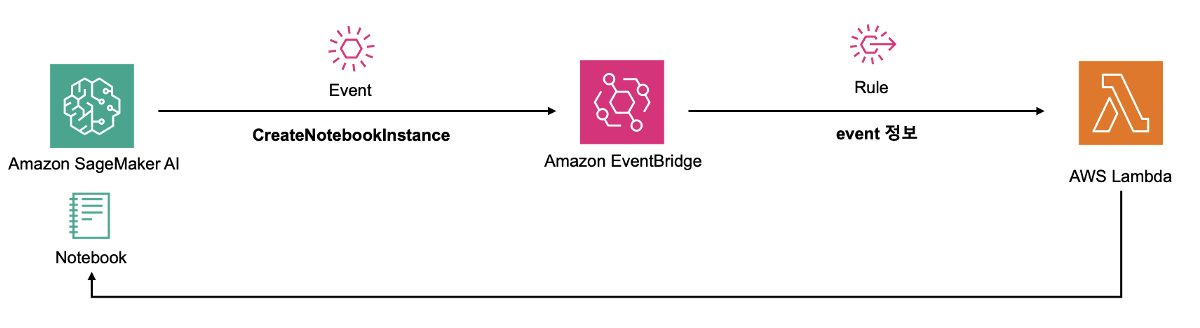
흐름
사용자의 notebook creation
-> eventbridge에서 이벤트 감지
-> lambda 호출
-> 생성된 notebook lifecycle 업데이트
구성 아키텍처
실제 구성 하기
- sagemaker lifecycle configurations 생성
- notebook lifecycle 업데이트 기능의 lambda 생성
- eventbridge rule 세팅
순으로 실제 구성을 진행합니다.
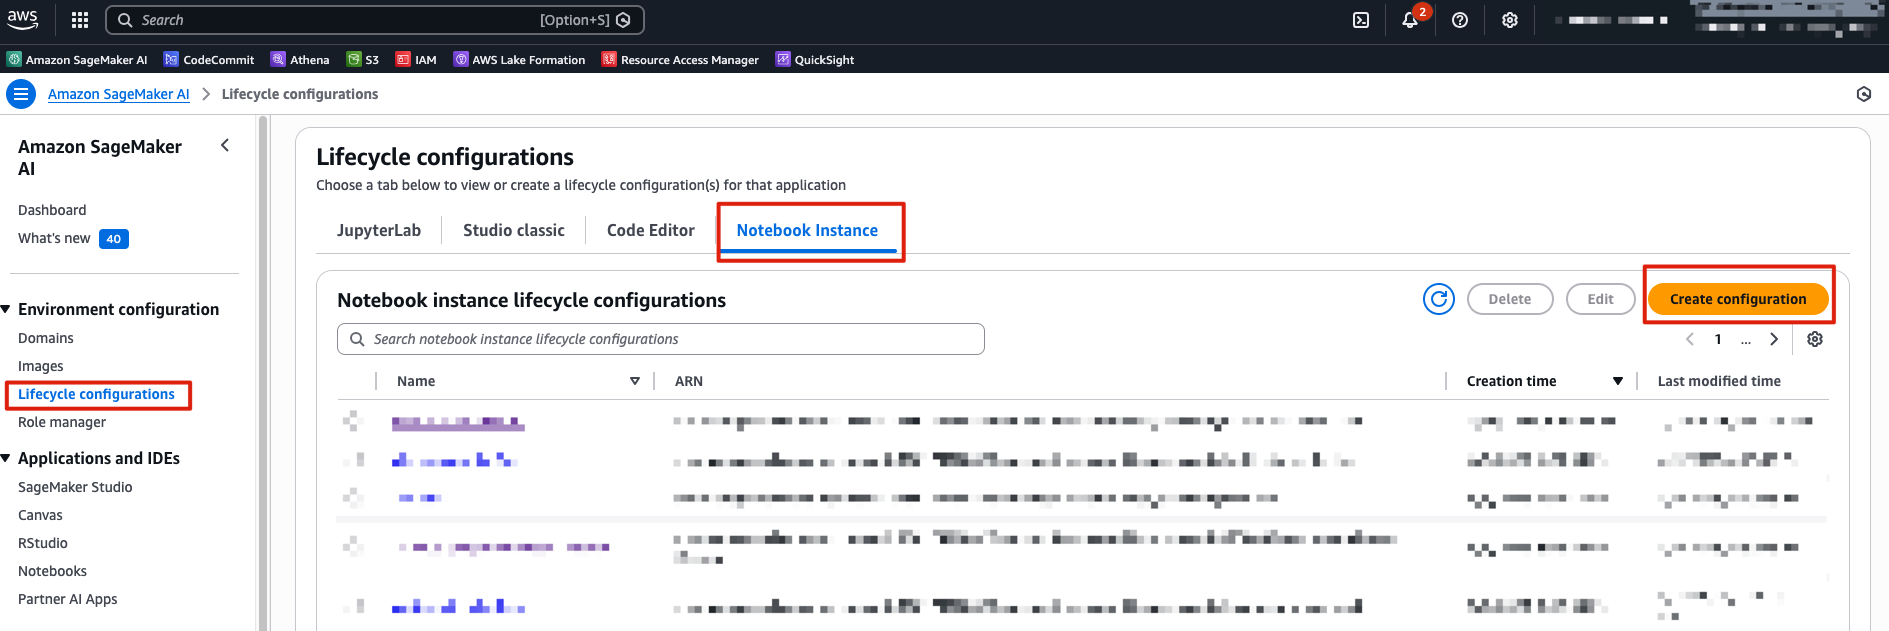
1. Sagemaker lifecycle configurations 생성
- Amazon Sagemaker AI >> Lifecycle configurations >> Create lifecycle configuration
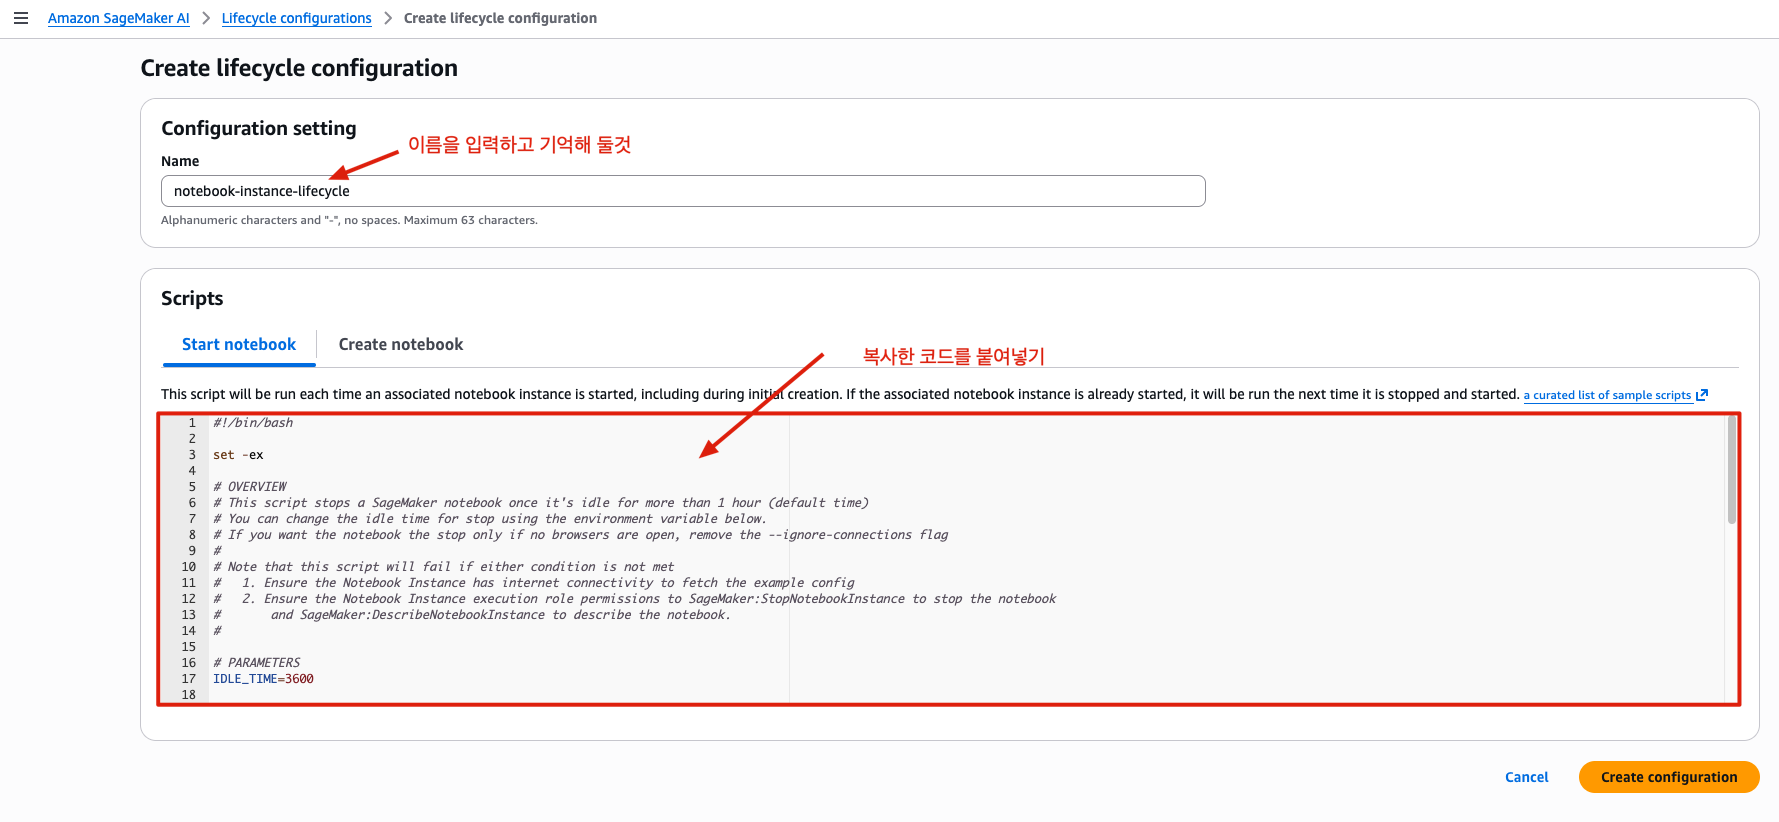
- lifecycle configuration code
#!/bin/bash

set -ex

# OVERVIEW
# This script stops a SageMaker notebook once it's idle for more than 1 hour (default time)
# You can change the idle time for stop using the environment variable below.
# If you want the notebook the stop only if no browsers are open, remove the --ignore-connections flag
#
# Note that this script will fail if either condition is not met
#   1. Ensure the Notebook Instance has internet connectivity to fetch the example config
#   2. Ensure the Notebook Instance execution role permissions to SageMaker:StopNotebookInstance to stop the notebook
#       and SageMaker:DescribeNotebookInstance to describe the notebook.
#

# PARAMETERS
IDLE_TIME=3600

echo "Fetching the autostop script"
wget https://raw.githubusercontent.com/aws-samples/amazon-sagemaker-notebook-instance-lifecycle-config-samples/master/scripts/auto-stop-idle/autostop.py


echo "Detecting Python install with boto3 install"

# Find which install has boto3 and use that to run the cron command. So will use default when available
# Redirect stderr as it is unneeded
CONDA_PYTHON_DIR=$(source /home/ec2-user/anaconda3/bin/activate /home/ec2-user/anaconda3/envs/JupyterSystemEnv && which python)
if $CONDA_PYTHON_DIR -c "import boto3" 2>/dev/null; then
    PYTHON_DIR=$CONDA_PYTHON_DIR
elif /usr/bin/python -c "import boto3" 2>/dev/null; then
    PYTHON_DIR='/usr/bin/python'
else
    # If no boto3 just quit because the script won't work
    echo "No boto3 found in Python or Python3. Exiting..."
    exit 1
fi

echo "Found boto3 at $PYTHON_DIR"


echo "Starting the SageMaker autostop script in cron"

(crontab -l 2>/dev/null; echo "*/5 * * * * $PYTHON_DIR $PWD/autostop.py --time $IDLE_TIME --ignore-connections >> /var/log/jupyter.log") | crontab -- 위의 코드를 복사하여 아래 script 입력 창에 붙여넣기
이때 저장하는 Configuration setting 이름은 기억해 둘것
(여기서는 notebook-instance-lifecycle 으로 지정함)
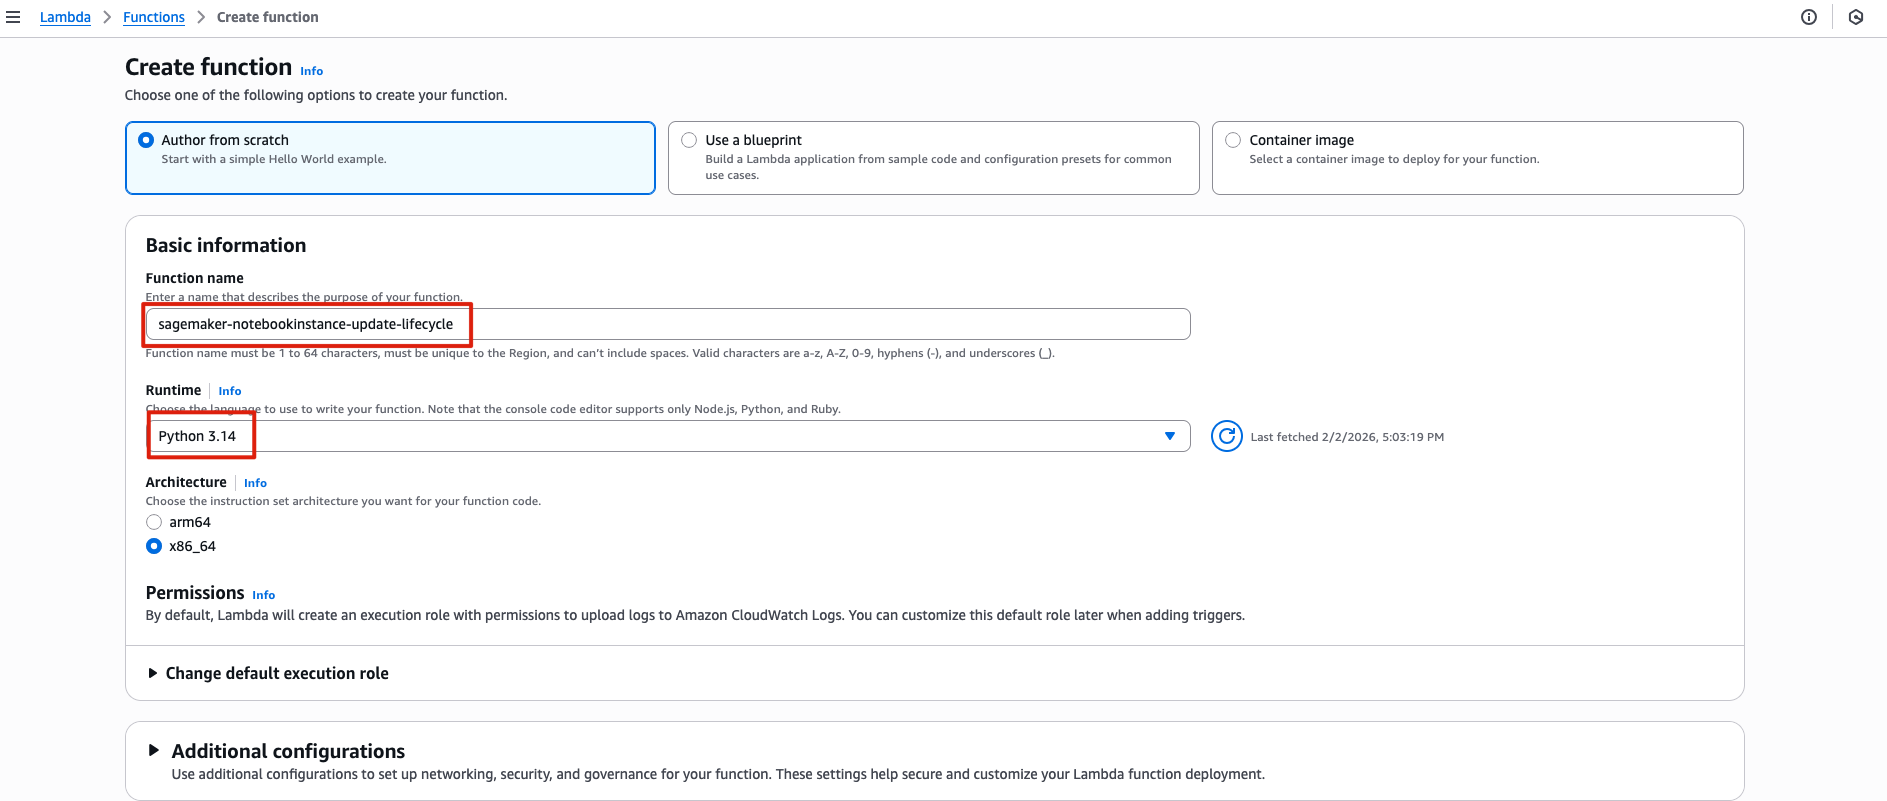
2. notebook lifecycle 업데이트 기능의 lambda 생성
-
lambda function 생성

-
function name: sagemaker-notebookinstance-update-lifecycle (이름은 자유)
-
runtime: python 3.14
-
- Sagemaker lifecycle configurations에서 생성한 리소스의 이름을 코드 내에 입력
- LifecycleConfigName: notebook-instance-lifecycle
import boto3
import time
sm = boto3.client("sagemaker")

def wait_until_any(name, targets, timeout_sec=1200, poll_sec=30):
      start = time.time()
      while True:
          status = sm.describe_notebook_instance(
              NotebookInstanceName=name
          )["NotebookInstanceStatus"]
          if status in targets:
              return status
          if time.time() - start > timeout_sec:
              raise TimeoutError(f"Timeout waiting for {name} in {targets}. Current={status}")
          time.sleep(poll_sec)


def lambda_handler(event, context):
    name = event["detail"]["requestParameters"]["notebookInstanceName"]

    desc = sm.describe_notebook_instance(NotebookInstanceName=name)
    current_lcc = desc.get("LifecycleConfigName")
    if current_lcc:
        # 이미 붙어 있으면 종료
        return {"skipped": True, "reason": f"LifecycleConfigName already set: {current_lcc}"}

    # 1) Wait until it is actionable
    status = wait_until_any(name, ["InService", "Stopped", "Failed"])

    # 2) If running, stop first
    if status == "InService":
        sm.stop_notebook_instance(NotebookInstanceName=name)
        wait_until_any(name, ["Stopped", "Failed"])

    # 3) Attach lifecycle config (allowed when Stopped/Failed)
    sm.update_notebook_instance(
        NotebookInstanceName=name,
        LifecycleConfigName="notebook-instance-lifecycle"
    )

    print(f"notebook name: {name}, result: {result}")
3. eventbridge rule 세팅
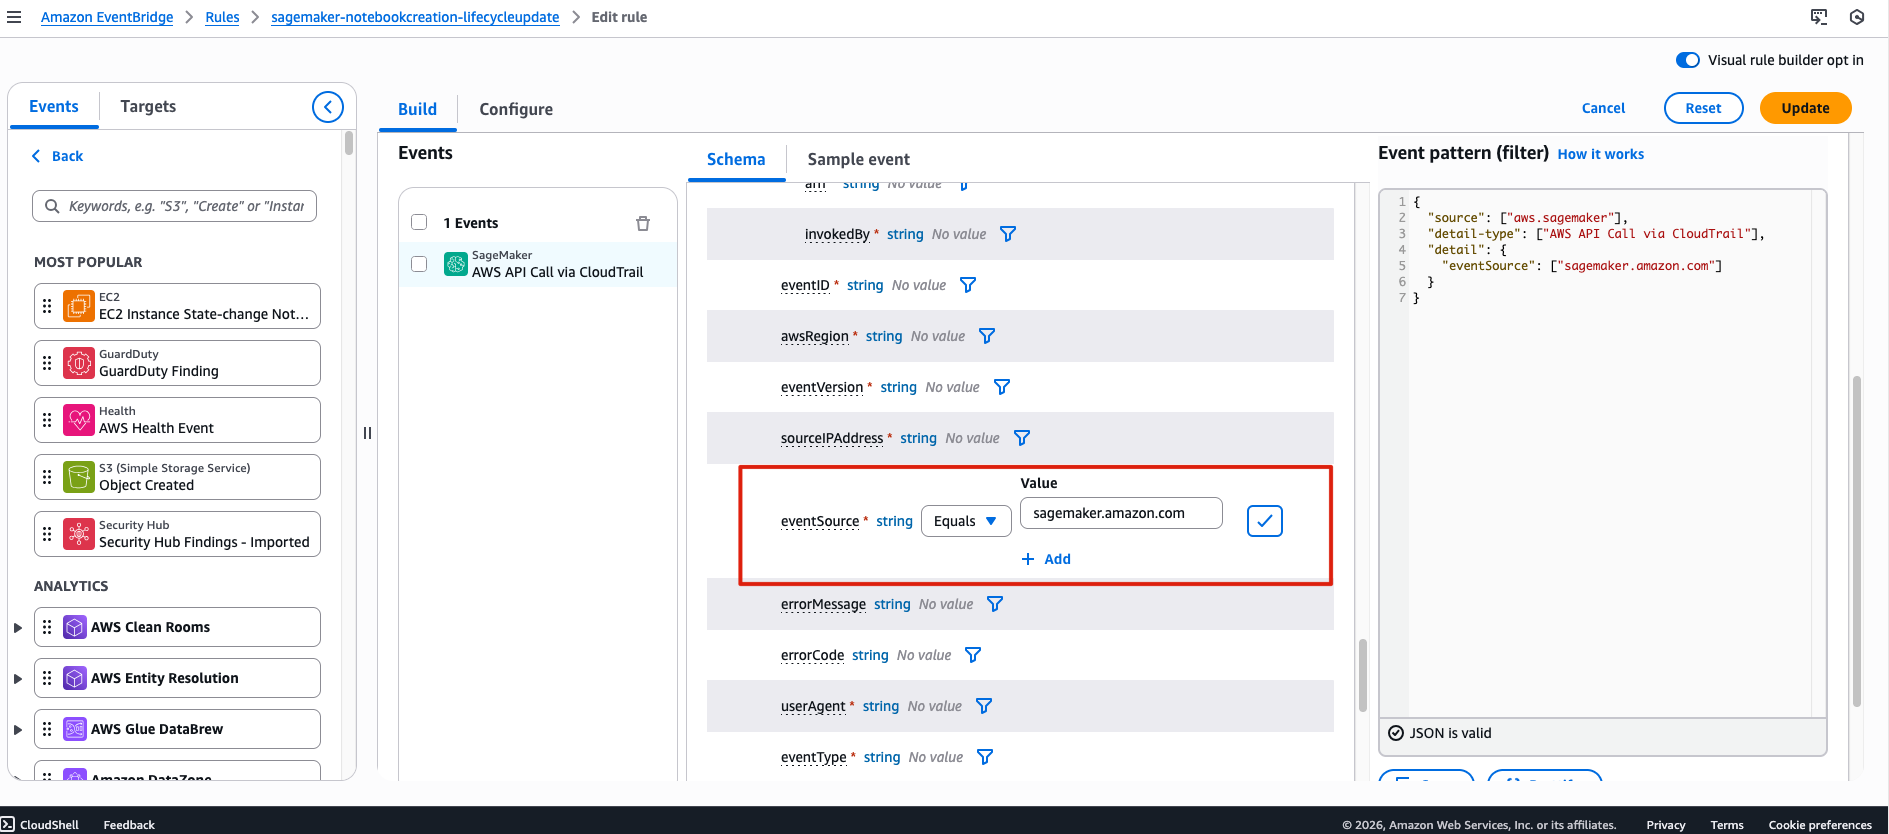
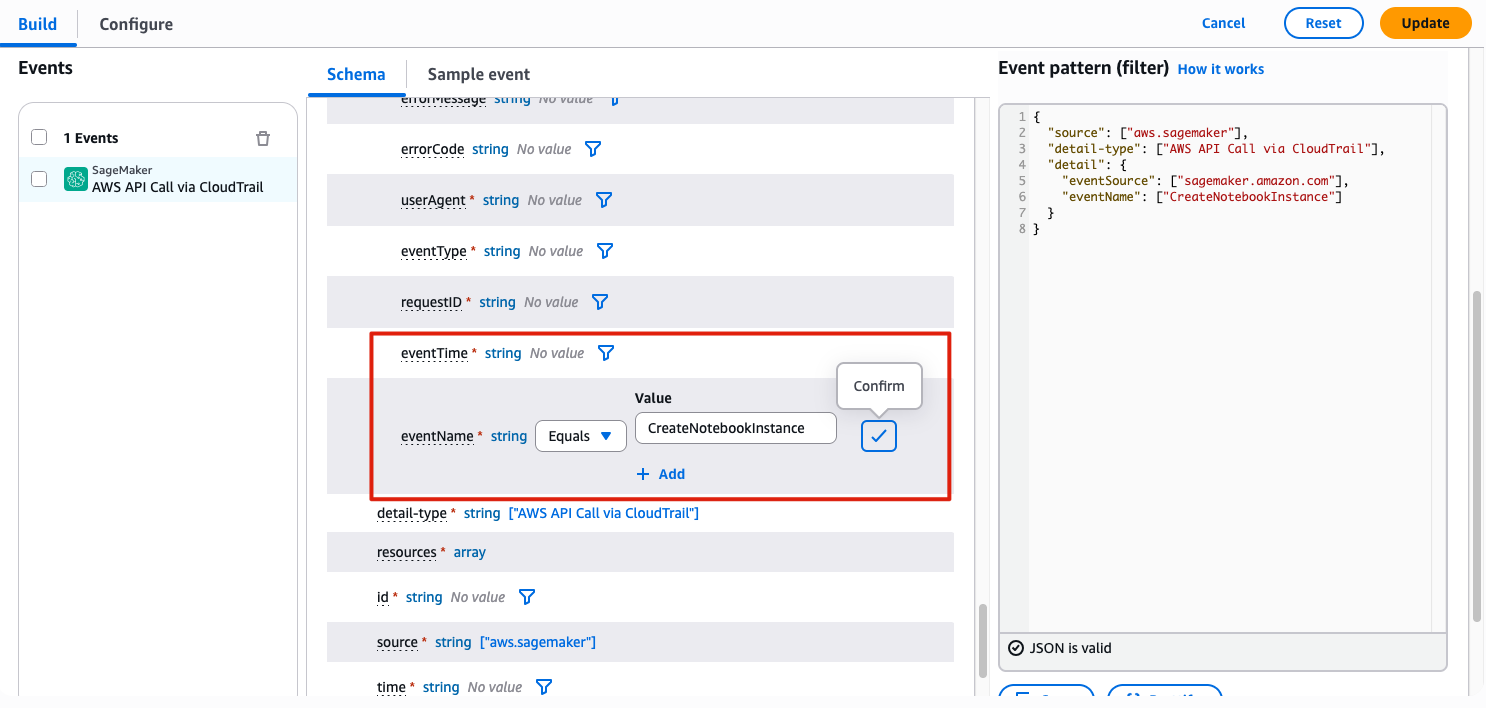
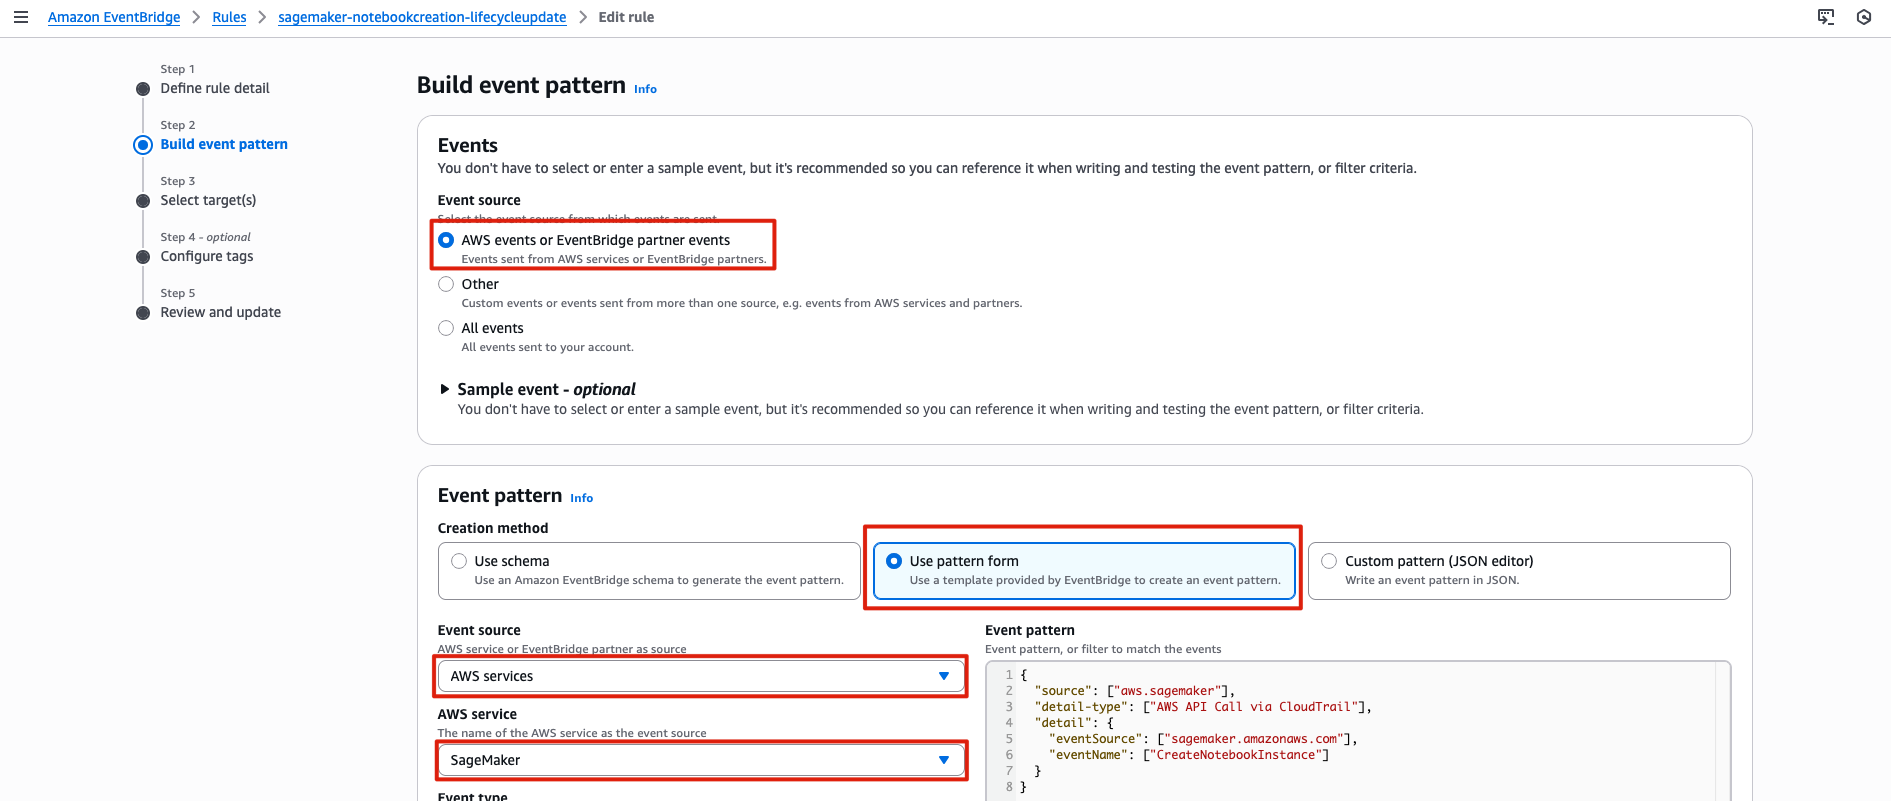
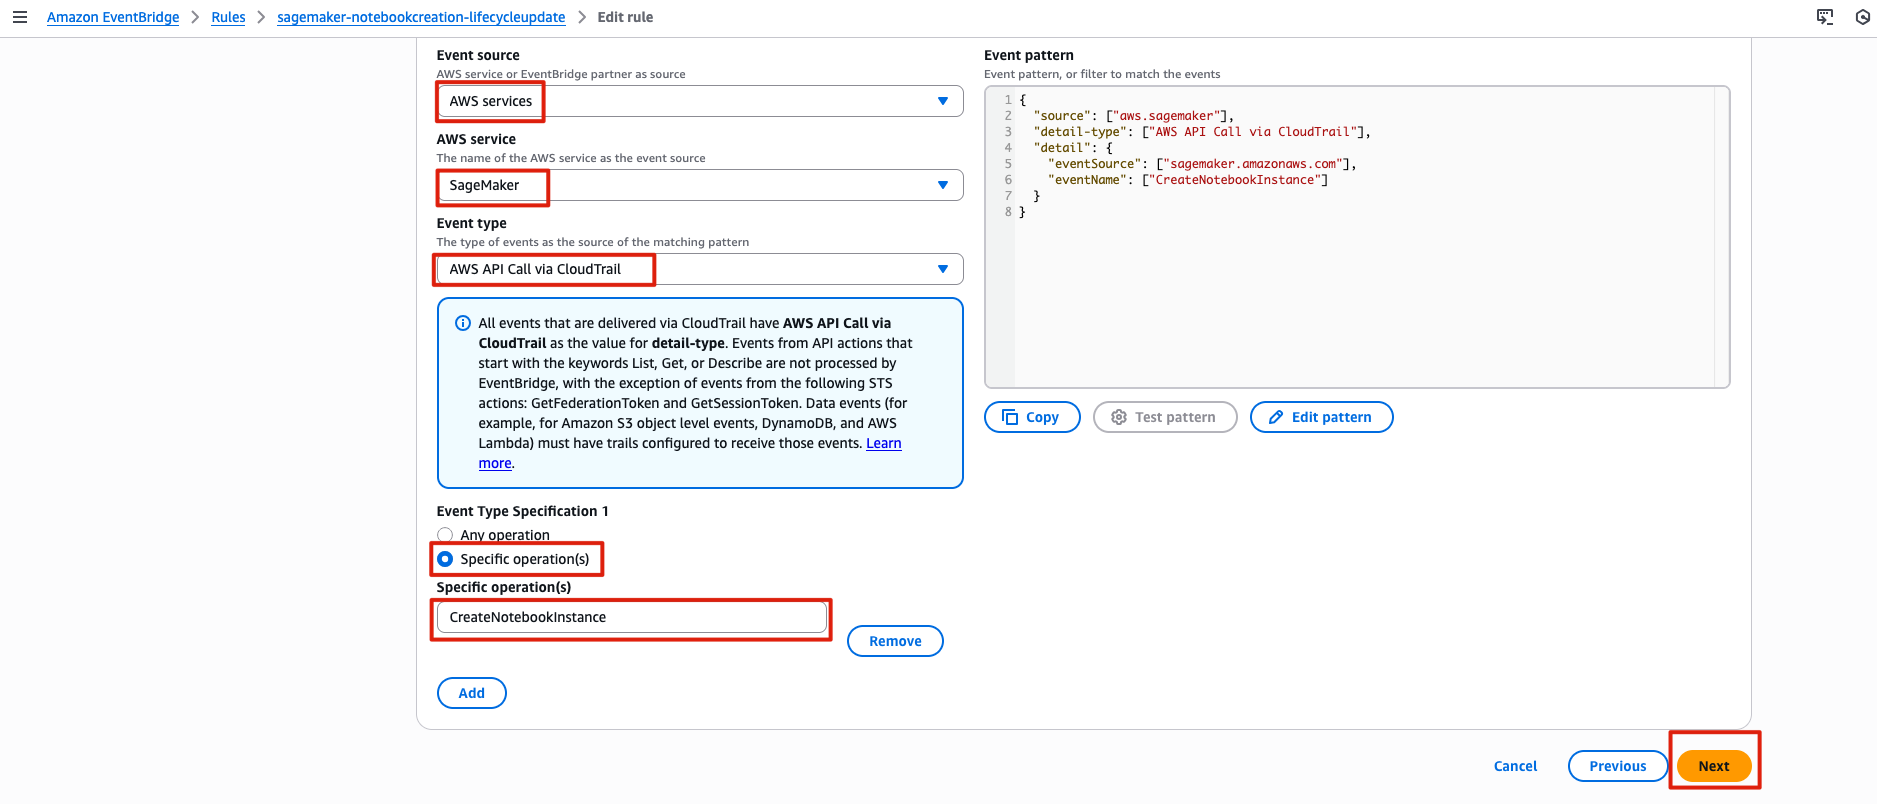
eventbridge에서 감지할 이벤트 패턴
{
  "source": ["aws.sagemaker"],
  "detail-type": ["AWS API Call via CloudTrail"],
  "detail": {
    "eventSource": ["sagemaker.amazonaws.com"],
    "eventName": ["CreateNotebookInstance"]
  }
}
Eventbridge rule
Triggering Event: (감지할 이벤트)
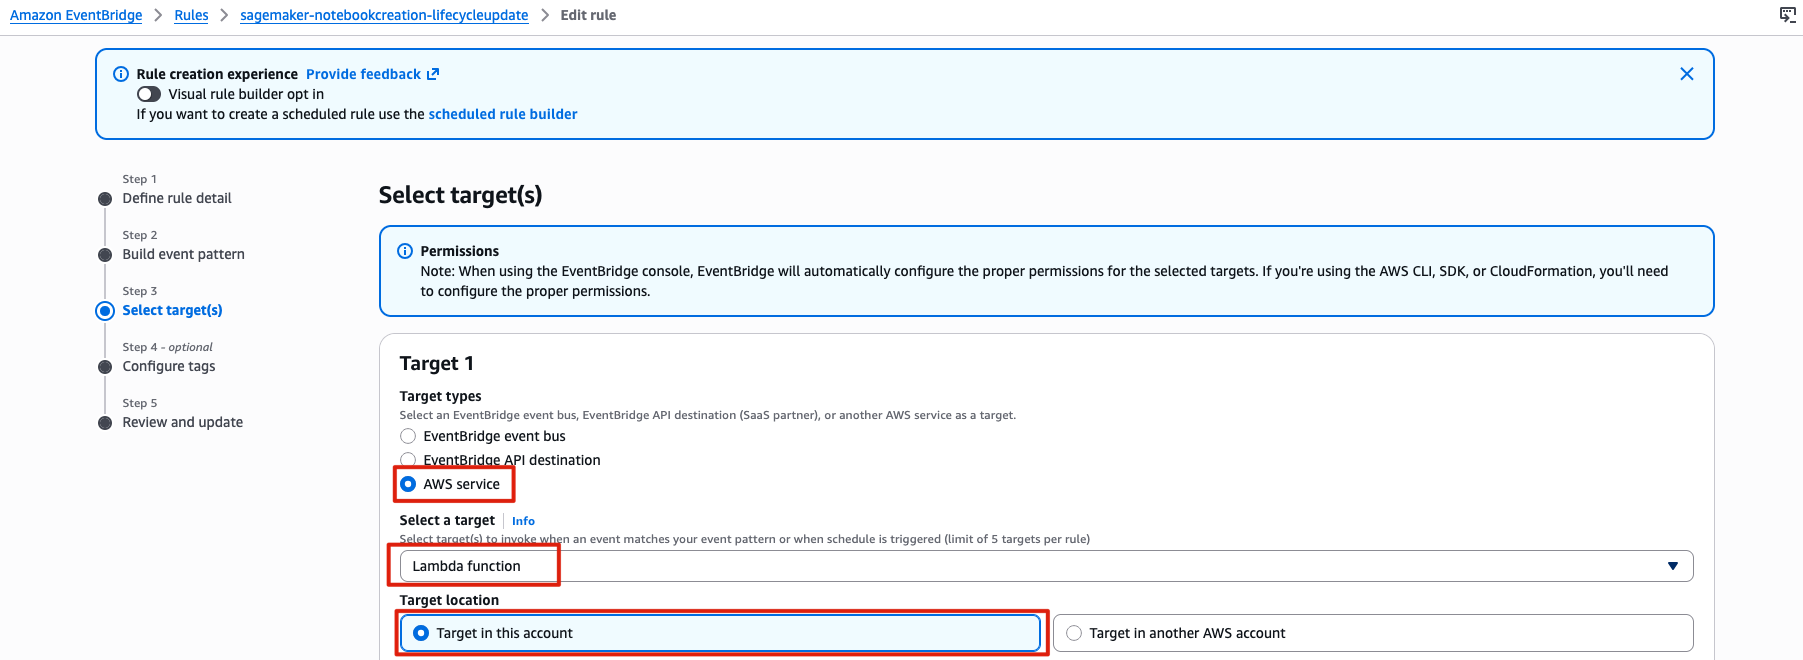
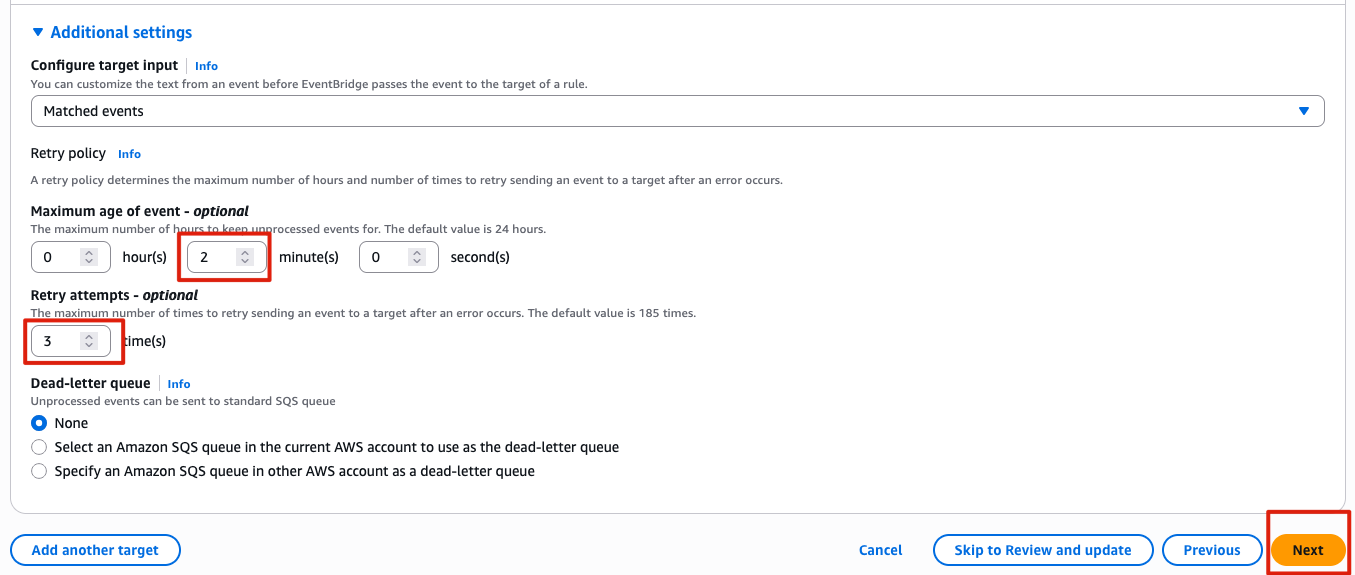
CreateNotebookInstance이벤트 패턴Targets: (이벤트 감지 시 정보를 받게 되는 대상)
Lambda: 이벤트 정보를 받아 notebook lifecycle 정보를 업데이트
방법은 아래 둘중 하나를 통해 선택 진행
방법 1. Visual rule builder opt in 사용
Rule Name: sagemaker-notebook-creation-lifecycle-update
-
Sagemaker AWS API Call via CloudTrail 검색 Triggering Event
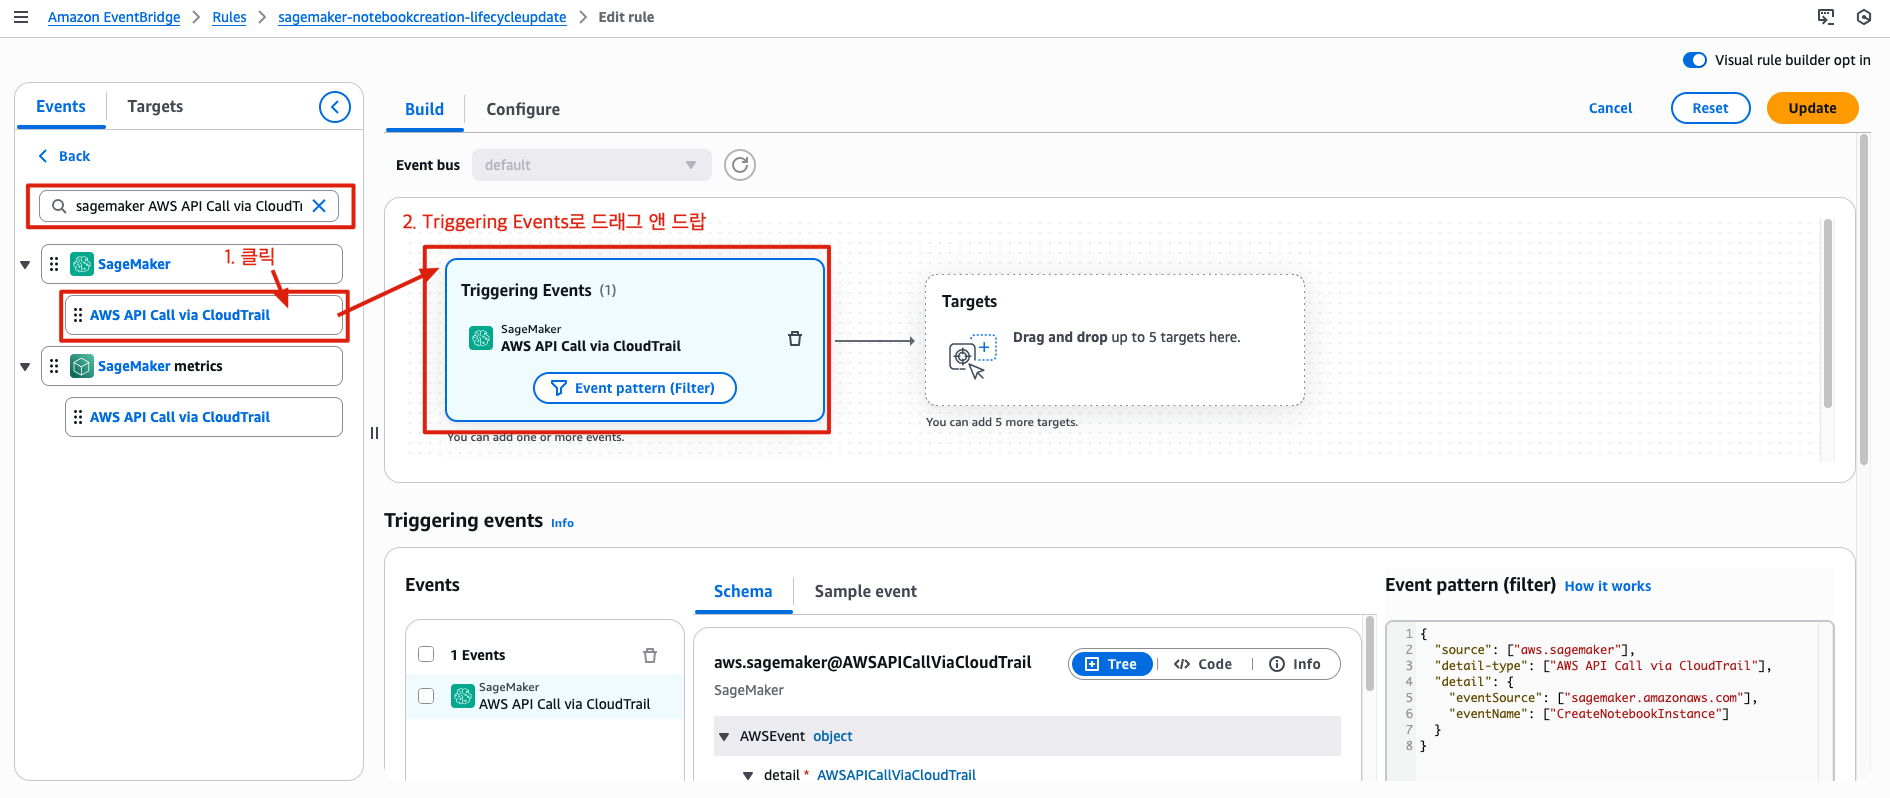
-
schema에서 eventSource, eventName 검색
eventSource:sagemaker.amazon.com
eventName:CreateNotebookInstance
- Lambda 지정
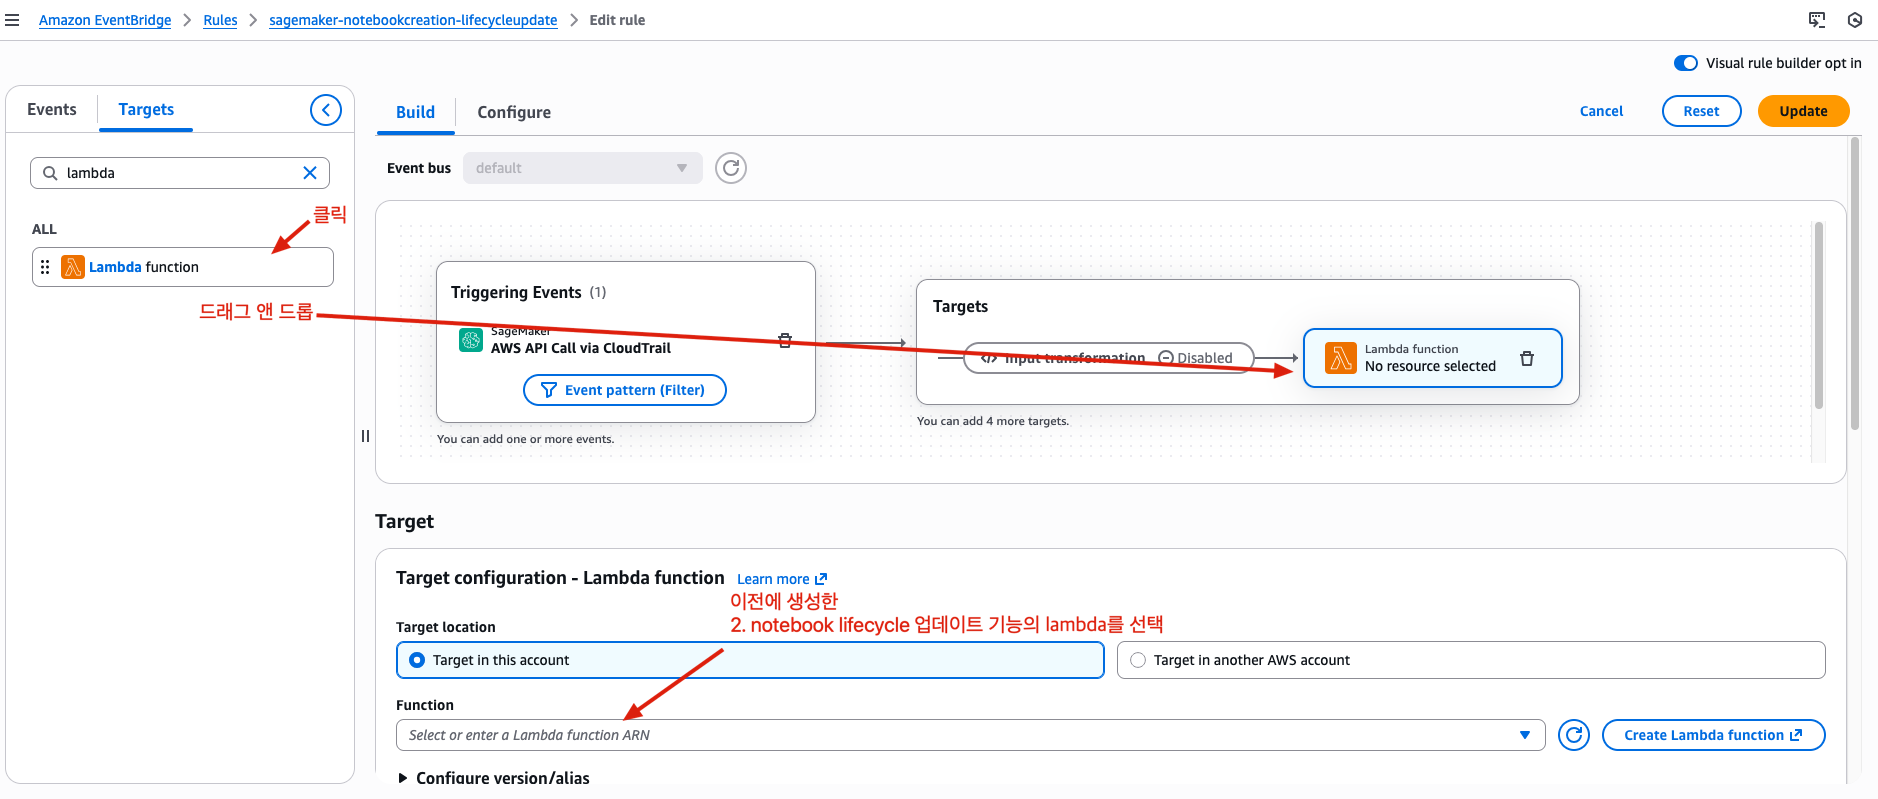
Execition role은 필요에 따라 기존에 사용하는 것이 있으면
Use existing role을 사용.
없으면 Create a new role for this specific resource 사용합니다.
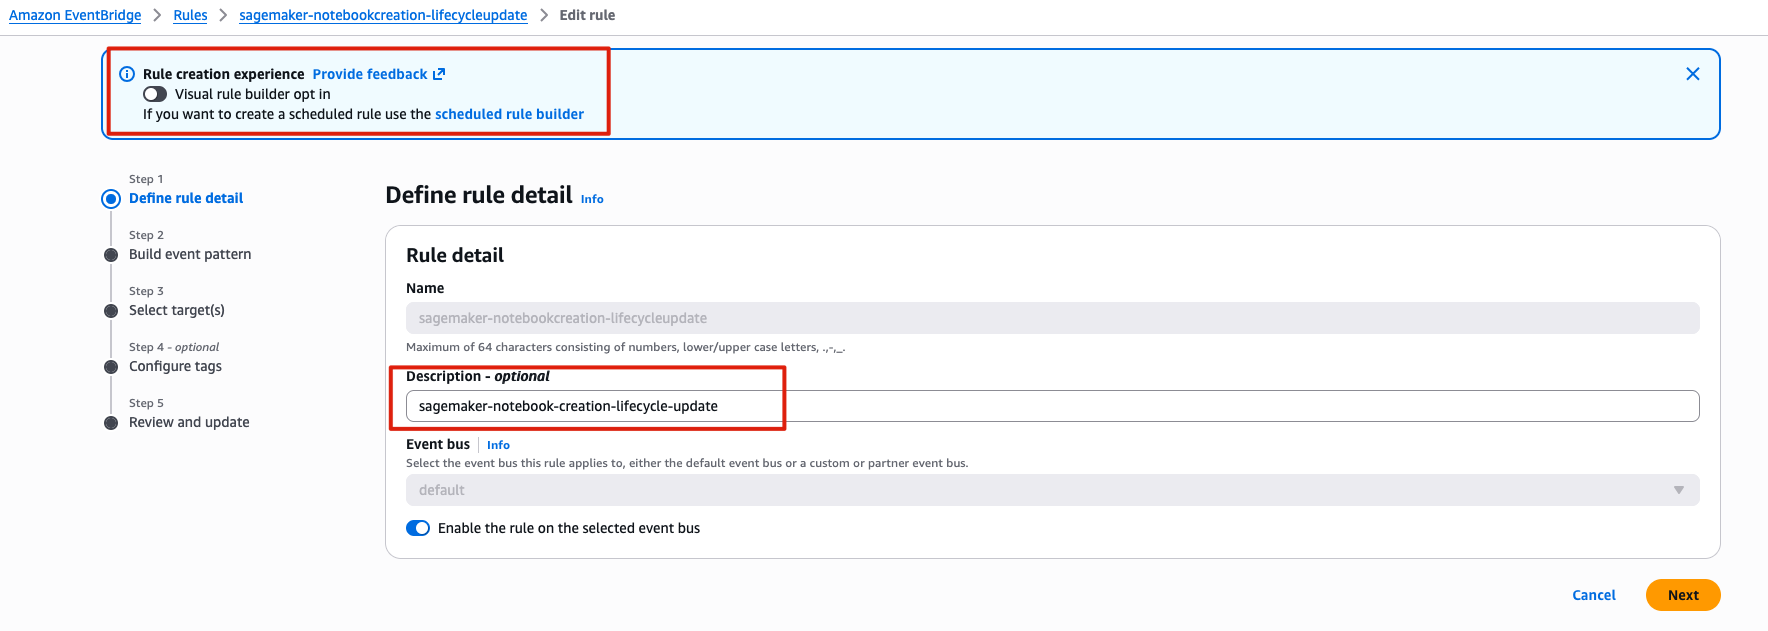
방법 2. 일반 Rule 생성
Rule Name: sagemaker-notebook-creation-lifecycle-update
Define rule detail
Build event pattern
Select target

Configure tags
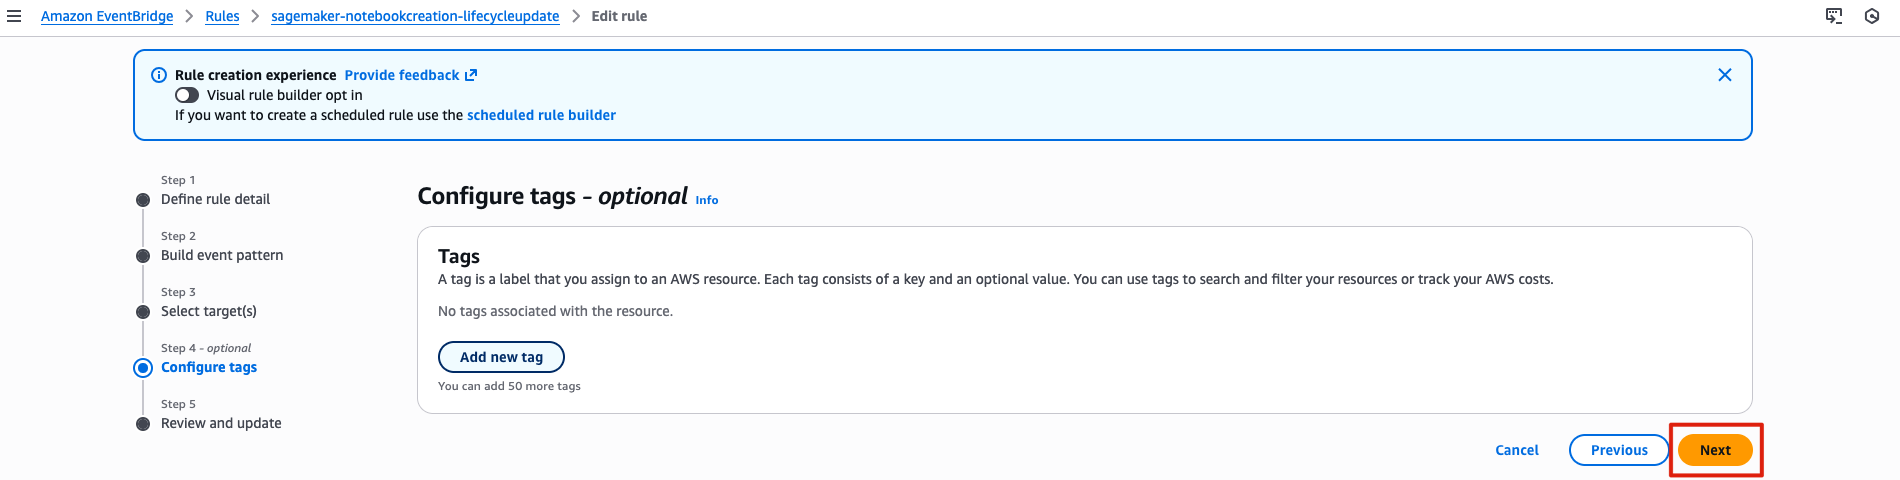
Review and update
